


 Canada
 United States (US)
Cobalt Dive Computer Software Download
Keep your Cobalt Up to Date
The Cobalt is designed to allow periodic firmware updates to its operating system to enhance performance and improve reliability. The most recent firmware update will be posted on this site for download and installation into your Cobalt or Cobalt 2. We recommend that you maintain your Cobalt with the latest firmware version.
Check Your Existing Firmware Version
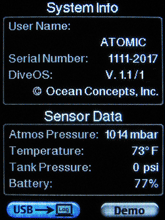
Go to Main Menu > Settings Menu > System Information. Check the firmware version.
Original Cobalt: version 1.62
Cobalt2: version 2.5
Original Cobalt was manufactured between 2010-2013. Cobalt 2 was introduced in January of 2014.
Do not update your Cobalt with a firmware version earlier than the one you currently have!
Choose your Computer and Operating System
Cobalt 2 Windows Instructions
No special program is needed to update the Cobalt 2 firmware. The same Atomic Aquatics Cobalt Divelog Program for the original Cobalt works for Cobalt 2 and is available for download. This Divelog software can be used to upload and record your dives to a PC. Additional third party dive log applications that support the Cobalt include:
SubSurface, an open source, free, multi platform (Mac, Windows, Linux) dive logging package
Download the Firmware
Download the firmware from the link below. Once completed, UNZIP the .zip file to extract the “S19” firmware file. Keep the location handy for transfer to your Cobalt 2 Dive Computer.
Connect Your Cobalt 2
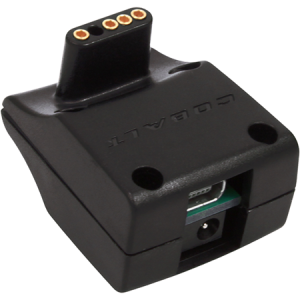
Cobalt USB/AC Adapter
The USB side in this image is facing up.

Mini-USB to USB Cable
Insert one end into the USB Adapter on your Cobalt 2 and the other to your PC.
Prepare your Cobalt for File Transfer
Place your Cobalt in “Bootloader” Mode
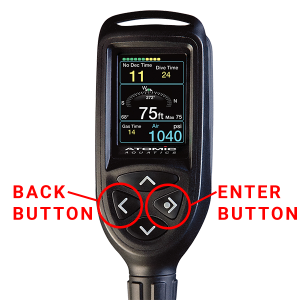
- On your Cobalt 2 Dive Computer, press both the “ENTER BUTTON” and the “BACK BUTTON” simultaneously for at least 11 seconds, until the screen on your Cobalt 2 goes dark.
- Once the screen on your Cobalt 2 goes black, release the buttons.
- You will hear your PC make the “device connected” sound.
- Explore your PC using Windows Explorer
 {on your computer keyboard, press the Windows Key and E at the same time to open the Explorer ( + E )}
- If you have an older version of Windows, you may get the “Auto Play
 ” popup. You want to “Open Folder to view files”
- If you have an older version of Windows, you may get the “Auto Play
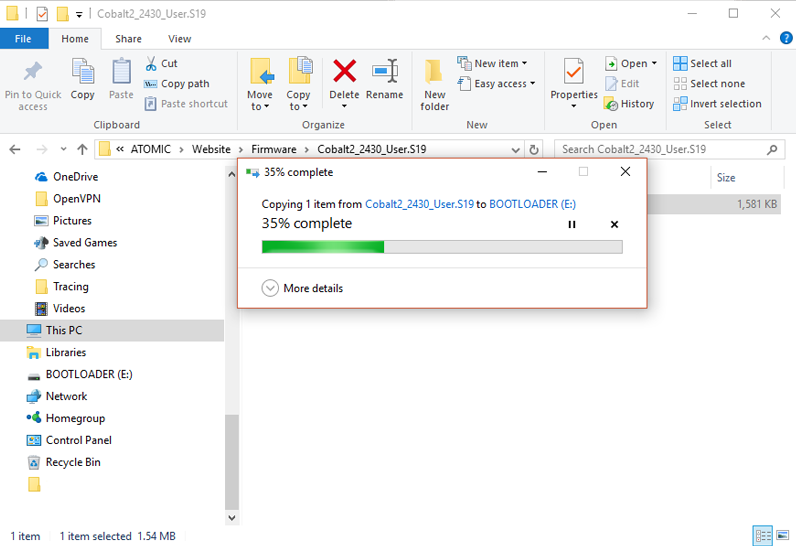
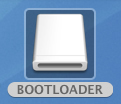
- Look for “BOOTLOADER” it should be drive “D” or the next available drive letter.
- Transfer the S19 File to the “BOOTLOADER” by Drag and Drop.
- Once the file transfer is complete, RIGHT Click on the “BOOTLOADER” icon (on the left of your Explorer Window) and click “Eject” to safely eject the Cobalt 2 Computer.
- The screen on your Cobalt 2 will remain dark for a few moments while the update completes, then the screen will come on and show the time/date screen. If you do not see the time/ date screen, first disconnect the Cobalt from the adapter, then press both the “ENTER BUTTON” and the “BACK BUTTON” simultaneously for at least 11 seconds to manually reset.
- The update process is completed.
Go to Main Menu > Settings Menu > System Information. Check the firmware version.
Cobalt2: version 2.5
Your Cobalt 2 dive computer is now up to date.
Cobalt 2 Mac Instructions
No special program is needed to update the Cobalt 2 firmware.
Dive log options for Mac and iOS:
SubSurface, an open source, free, multi platform (Mac, Windows, Linux) dive logging package.
MacDive a low cost full featured dive log program that handles many computers, and can also connect to an iOS version.
Dive Log DT, a low cost and full featured logging program with multiple computer support and an interface to iOS devices through their free Dive Log application.
Download the Firmware
Download the firmware from the link below. Most Macs will unzip the file automatically, if not, UNZIP the .zip file to extract the “S19” firmware file. Keep the location handy for transfer to your Cobalt 2 Dive Computer.
Prepare your Cobalt 2 for File Transfer
Cobalt USB/AC Adapter
The USB side in this image is facing up.
Mini-USB to USB Cable
Insert one end into the USB Adapter on your Cobalt 2 and the other to your Mac.
Prepare your Cobalt for File Transfer
Place your Cobalt in “Bootloader” Mode
- On your Cobalt 2 Dive Computer, press both the “ENTER BUTTON” and the “BACK BUTTON” simultaneously for at least 11 seconds, until the screen on your Cobalt 2 goes dark.
- Once the screen on your Cobalt 2 goes black, release the buttons.
- After a few moments, you will see the BOOTLOADER
 icon appear on your Mac desktop. This indicates that your Mac has recognized your Cobalt 2 as a USB device.
 - Double-click the BOOTLOADER icon to open the window
 .
. - Drag and drop the “S19” file from your desktop into the Bootloader window. You will see a
 copy window showing the file being copied. After the file is copied, the copy window will disappear.
 - Eject your Cobalt. Either drag the BOOTLOADER icon to the trash, or go to the menu bar on the left and look for Bootloader in the menu tree. Right click on it and select “Eject”. The window will disappear.
- The screen on your Cobalt 2 will remain dark for a few moments while the update completes, then the screen will come on and show the time/date screen. If you do not see the time/ date screen, first disconnect the Cobalt from the adapter, then press both the “ENTER BUTTON” and the “BACK BUTTON” simultaneously for at least 11 seconds to manually reset.
- The update process is completed.
Go to Main Menu > Settings Menu > System Information. Check the firmware version.
Cobalt2: version 2.5
Your Cobalt 2 dive computer is now up to date.
Cobalt Windows Instructions
The Cobalt Divelog program for Windows is required for updating the firmware on the Cobalt Dive Computer. This is available for download here. Additionally, this Divelog software can be used to upload and record your dives to a PC. Additional third party dive log applications that support the Cobalt include:
SubSurface, an open source, free, multi platform (Mac, Windows, Linux) dive logging package
Download the Firmware
Download the firmware from the link below. Once completed, UNZIP the .zip file to extract the “HEX” firmware file. Keep the location handy for transfer to your Cobalt Dive Computer.
Prepare your Cobalt for File Transfer
Cobalt USB/AC Adapter
The USB side in this image is facing up.
Mini-USB to USB Cable
Insert one end into the USB Adapter on your Cobalt and the other to your PC.
Prepare your Cobalt for File Transfer

On the Cobalt, navigate from Main Menu> Settings> System Info. Highlight the USB button, and press SELECT.
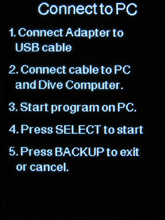
Connect the USB cable to a free USB port on your PC and connect the other end to the USB side of the adapter.
Plug in the USB adapter to the Cobalt- make sure you are plugging in the USB side of the adapter ( the side with the 4 gold sockets).
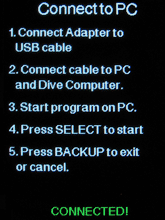
With the USB adapter plugged into the Cobalt, press the SELECT button. A green “Connected” message should appear at the bottom of the Cobalt’s screen. This indicates that the Cobalt and your PC are connected, and that you are ready to start the update process.
You can safely back out of the update process up to the point you initiate flashing the computer from your PC desktop.
On Windows:
- Open the Dive Log application.
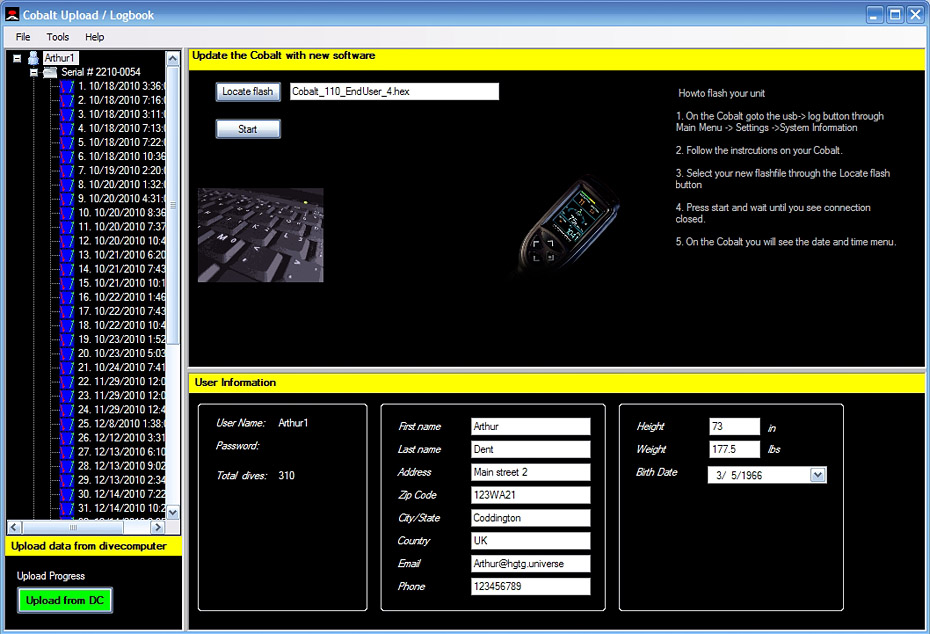 Select Flash the DC from the Tools menu.
 - Locate the flash file (make sure you select the uncompressed hex file, not the .zip file) and follow the on screen instructions.
- Press Start to begin, progress will be indicated in the window. The update process will take about a minute. Once the update process has begun, do not disturb the connections until it is complete.
- When the process is complete, “connection closed” will appear on your PC screen, and it is safe to unplug the computer. The Cobalt will come up to the Set Time and Date screen, and will default to the time of the last dive.
- If the update process stalls or fails to compete, disconnect the USB cable, reconnect and try again.
 Select Flash the DC from the Tools menu
Windows 10 users:
- Copy the uncompressed hex file to C:\ProgramData\AtomicsAquatics\Cobalt-Logbook\hexfiles.
- You may need to change a setting on the Windows 10 File Explorer to enable the viewing of hidden files (an option under the View tab of File Explorer).
- Once a USB connection is established between the dive computer and Windows computer, the Logbook flash option will work. You can drag the hex file which will appear on the flash screen over to the image of the Cobalt, and the update will be completed.
Go to Main Menu > Settings Menu > System Information. Check the firmware version.
Cobalt: version 1.62
Your Cobalt dive computer is now up to date.
Cobalt Mac Instructions
In order to install firmware updates, you must first download and install onto your Mac an installation program. This application will allow you to install the latest firmware update to your original Cobalt.
First, check your version of Mac OS by selecting “About This Mac” from the Apple menu.
If you are using High Sierra (version 10.13) or earlier you must install this program Atomic Updater 2.0.6.
If you are using Mojave (10.14) or later, you should install this program version Atomic Updater 3.02
This flash tool allows you to install the latest firmware update to your Cobalt. If you get a warning on opening the program that it is from an unidentified developer, control-click the app icon, then choose Open from the shortcut menu.
Dive log options for Mac and iOS:
SubSurface, an open source, free, multi platform (Mac, Windows, Linux) dive logging package.
MacDive a low cost full featured dive log program that handles many computers, and can also connect to an iOS version.
Dive Log DT, a low cost and full featured logging program with multiple computer support and an interface to iOS devices through their free Dive Log application.
Download the Firmware
Download the firmware from the link below. Once completed, UNZIP the .zip file to extract the “HEX” firmware file. Keep the location handy for transfer to your Cobalt Dive Computer.
Prepare your Cobalt for File Transfer
Cobalt USB/AC Adapter
The USB side in this image is facing up.
Mini-USB to USB Cable
Insert one end into the USB Adapter on your Cobalt and the other to your Mac.
Prepare your Cobalt for File Transfer
- Navigate on the Cobalt to the System Info screen, and press SELECT with the USB button highlighted. This will take you to the Connect to PC screen on your Cobalt.
- Start the Atomic Updater program on the Mac.
- Select the “Select “hex” file” button, then within the dialog that comes up, select the .hex file
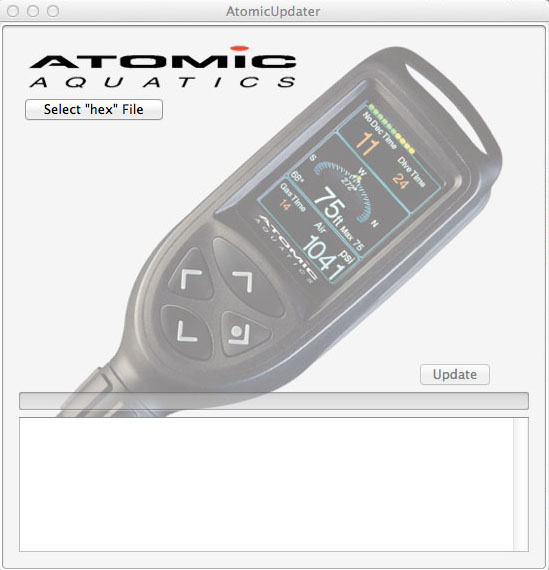 by double clicking or highlighting and selecting the ‘Open” button. The .hex file will appear under the button when you have selected it.
 - On the Cobalt, press SELECT while in the Connect to PC screen. A green “connected” message will appear a the bottom of the screen. If it doesn’t you don’t have a solid USB connection, check the cable or adapter.
- On the Mac, the “update” button now be will be enabled
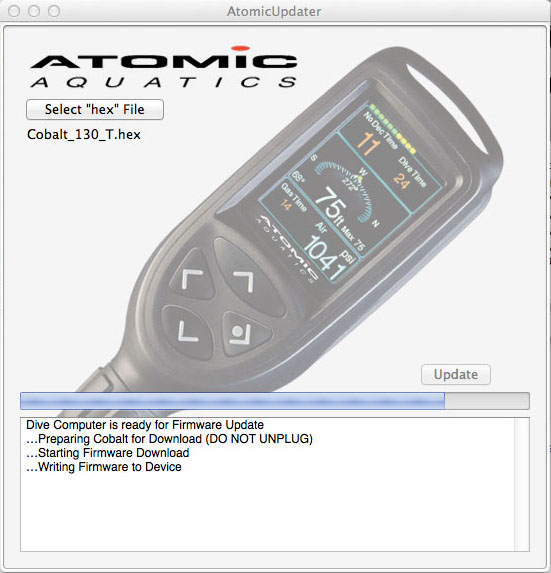 , and the message “Dive Computer is ready for Firmware Update” will appear in the box. The update process will take a minute or two. DO NOT unplug the Cobalt while it is in progress.
 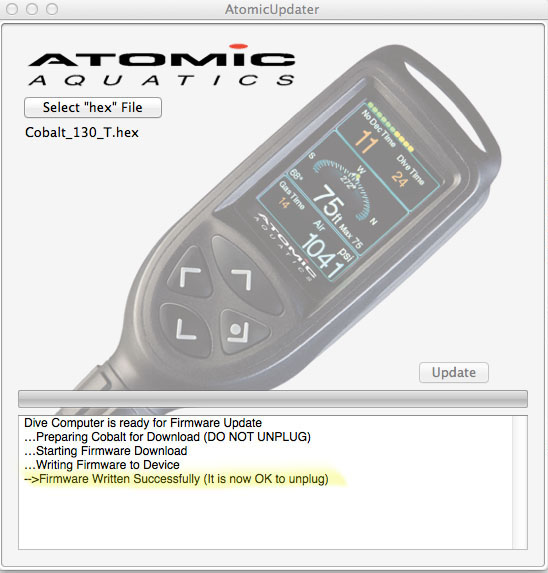 When complete, the Cobalt will come up to the Set Time and Date screen and you will need to reset the time and date – it goes back to the time of the last dive.
Go to Main Menu > Settings Menu > System Information. Check the firmware version.
Cobalt: version 1.62
Your Cobalt dive computer is now up to date.
Recovery of a Cobalt after a failed update
The first thing the firmware update program does is to delete the previous program in the Cobalt. If it doesn’t complete the process, or isn’t pointed to the correct file on your local hard drive, it won’t have a new program to install, and it won’t come back up. But nothing fundamental has been harmed, it’s just a matter of getting the correct firmware loaded into the Cobalt.
Simply repeat the process for your appropriate computer, and restoration should be that simple.